
Removing the screen from a sliding window can seem like a daunting task if you’re unfamiliar with the process. But with a bit of knowledge and the right tools, it can be a simple task that you can accomplish in no time.
In this guide, we will walk you through the steps on how to remove the screen from a sliding window, helping you understand the process and making it easier for you to execute. Let’s get started!
The task of removing the screen from a sliding window involves a few clear steps. It primarily includes locating the pull tabs on the screen, using them to gently lift the screen, and subsequently sliding it out of its frame.
This task does not typically require any specialized tools and can be accomplished with ease, patience, and care. In the following sections, we will detail these steps, ensuring that you’re well-equipped to perform this task efficiently and safely.
Materials Needed
To carry out this task efficiently, the following items will be needed:
- Gloves: It’s always important to maintain safety first. Wearing gloves will protect your hands from any sharp edges on the screen.
- Flathead Screwdriver: This tool may be required in case the screen is stuck and needs a slight nudge.
- Rag or Soft Cloth: This will be used to clean the window track after the screen has been removed.
- Ladder or Stepping Stool: If the window is high, you might need a ladder or stepping stool to reach it.
- Safety Glasses: Debris might fly off while you’re removing the screen, so it’s a good idea to protect your eyes with safety glasses.
Step-by-Step Process
1. Open the Sliding Window

Before you start the process of removing the screen, it’s crucial to first open the sliding window. This will allow you to get a full view of the screen and access the pull tabs or latches that are typically located at the bottom.
Open the window completely, but ensure you do so gently to avoid any unnecessary pressure on the screen. By opening the window, you’ll also be making it much easier to reach the screen from the inside of your home, which can be particularly useful if your window is located at a higher elevation.
2. Locate the Screen’s Pull Tab
The next step is to locate the pull tabs or latches of the screen. These are typically located at the bottom of the screen and are essential tools for the removal process.
They’re easily identifiable as small tabs or latches that stick out from the screen’s frame. Once you’ve located the pull tabs, ensure that they’re in the inward position.
This will allow you to easily pull and lift the screen out of its tracks. Remember to do this gently to avoid damaging the screen or the window frame.
3. Pull the Tab Upwards
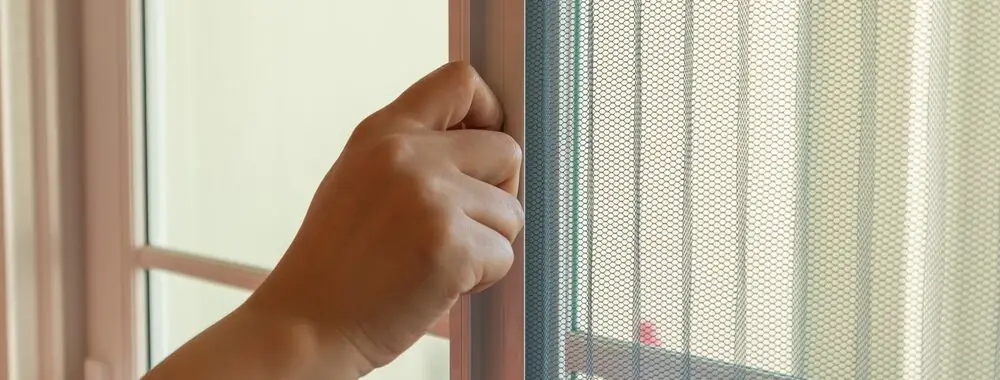
Once you’ve ensured that the pull tabs are in the correct position, the next step in the process of removing the screen from a sliding window is to gently pull the tabs upwards. This action is aimed at lifting the screen out of its slots.
Apply gentle and steady pressure as you pull the tabs upwards, making sure not to yank or jerk the screen abruptly, as this could potentially cause damage. The screen should, with consistent pressure, begin to lift up and out of its lower track.
As you pull, be conscious of the screen’s upper track to ensure it does not become stuck or damaged. The goal of this step is to successfully lift the screen high enough that the bottom edge can clear the window frame, allowing for easy removal.
4. Slide the Screen Out of the Track
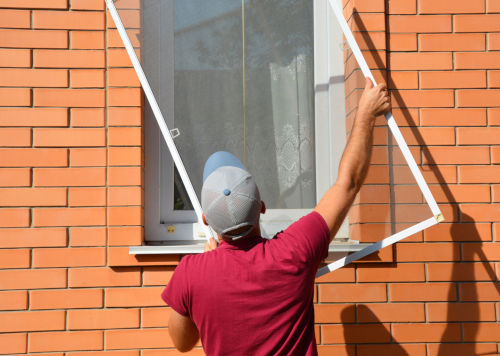
After you’ve successfully lifted the screen high enough to clear the window frame, the next step is to slide the screen out of the track.
his process needs to be executed with utmost caution to prevent any damage to the screen or the window frame. Gently hold the screen at the bottom where the pull tabs are located and slowly begin to guide the screen out of the upper track.
Make sure to maintain a steady grip on the screen to prevent it from falling. Simultaneously, you should also be mindful of the screen’s positioning; it should remain parallel to the window track during this process. If it tilts, it could get stuck or cause damage.
Once the screen is completely clear of the upper track, you can safely pull it out from the frame. Now, you have successfully removed the screen from the sliding window.
Remove Screen From Sliding Window Without Tabs
If your sliding window screen doesn’t have the convenient pull tabs to aid in its removal, don’t fret. You can still remove it using a different approach. Here’s the detailed procedure:
Position Yourself Correctly
The first step in removing a screen without tabs is to position yourself correctly. Stand on the side of the window where the screen is located. This position will give you the best leverage and control while removing the screen.
Lift the Screen
Next, you want to gently lift the screen from its lower track. Place your fingers under the bottom edge of the screen and apply gentle, consistent upward pressure. Be careful not to apply too much force as it can damage the screen or the window frame.
As you lift the screen, you should notice the bottom edge starting to come free from the lower track.
Slide the Screen
Following the lifting, you should slide the screen towards the center of the window. This action will free the screen from the side tracks. Ensure to maintain control of the screen during this process to prevent it from falling or getting damaged.
Remove the Screen
Finally, with the screen free from all tracks, you can now remove it from the window. Carefully pull the screen towards you, ensuring it remains parallel to the window to prevent any damage.
Congratulations! You’ve successfully removed the screen from your sliding window without tabs.
Remove Screen From Sliding Window With Tabs
Find the Tabs
The first step to remove a screen from a sliding window with tabs is to locate the pull tabs. These are typically situated at the bottom of the screen and can be pushed in or pulled out, depending on the design of your window.
Push/Pull the Tabs
Once you’ve located the tabs, the next step is to either push them in or pull them out. Some tabs slide horizontally along a track, while others require a bit of downward pressure. Be gentle to avoid breaking them.
Lift the Screen
After adjusting the tabs, you can now lift the screen. Similarly to the process without tabs, place your fingers under the bottom edge of the screen and lift gently, freeing the bottom edge from the lower track. Remember to exert steady, gentle pressure to avoid damaging the screen or the window frame.
Slide the Screen
Next, carefully slide the screen towards the center of the window. This maneuver will free the screen from the side tracks. Be sure to maintain control of the screen during this process to prevent it from falling or getting damaged.
Remove the Screen
Finally, with the screen dislodged from all tracks, you can now remove it from the window. Pull the screen towards you, keeping it parallel to the window to avoid potential damage. And there you have it, you’ve successfully removed the screen from your sliding window using the tabs.
Related Topics:
Safety Precautions
While removing a screen from a sliding window, there are some key safety precautions to keep in mind:
- Wear Protective Gear: Always wear gloves to protect your hands from the sharp edges of the screen or window frame. Safety glasses can help prevent dust or debris from falling into your eyes.
- Use Appropriate Tools: If the screen is fastened with screws, use a screwdriver of the right size to loosen them. Never force a tool that doesn’t fit as it can cause damage to the screen or your tool.
- Sturdy Footing: Ensure that you have a stable footing or a safe platform to stand on if the window is high. Use a solid and stable ladder if necessary.
- Be Gentle: Avoid using excessive force when removing the screen. Too much pressure can warp the screen frame or damage the window frame.
- Check for Glass: Be aware of any broken glass in the window track or on the screen itself. Handle it carefully to avoid cuts.
- Safe Disposal: After removing the screen, dispose of it safely, especially if it’s damaged or worn out. This will prevent injury to others.
Troubleshooting Common Issues
During the process of removing a screen from a sliding window, you may encounter a few common issues. Here are some tips to tackle those effectively:
- Stuck Screens: If the screen seems stuck, check for paint or dirt in the track that might be causing friction. Clean the track carefully with a brush or vacuum cleaner and try again.
- Rusty Screws: If the screws are rusty and difficult to unscrew, try applying a bit of penetrating oil and let it sit for a few minutes before attempting to unscrew them again.
- Damaged Screen Frames: If the screen frame is damaged or bent, it may be difficult to remove. In such cases, use a pair of pliers to carefully straighten the frame before attempting to remove the screen.
- Unmovable Windows: If the sliding window itself won’t move making it difficult to access the screen, consider lubricating the window tracks to make the window slide more easily.
- Screen Cleaning: If you’re having difficulty cleaning the screen before removal, use a soft brush and mild soapy water, making sure to rinse thoroughly and let dry before reinstalling.
- Defective Rollers: If the screen doesn’t glide smoothly, check the rollers at the bottom of the screen frame. They may need cleaning or replacement.
Conclusion
In conclusion, learning how to remove a screen from a sliding window is not as complicated as it may initially seem. Whether your window screen is equipped with pull tabs or not, the procedure is straightforward to execute with a bit of patience and the right tools.
The key is to approach the task with care and caution, ensuring that you neither damage the window screen nor hurt yourself in the process.
Remember to always follow safety protocols, such as wearing gloves and safety glasses, and using an appropriate ladder when accessing high windows.
With the knowledge and tips provided in this guide, you should be well-equipped to tackle this task successfully. So the next time your window screen needs a cleaning or a fix, you’ll know just what to do!
FAQs
What tools do I need to remove a screen from a sliding window?
Generally, you will need a flat-head screwdriver or a putty knife to gently pry the screen from its frame. However, if the screen is stuck due to a bent frame or stubborn rollers, you might also need a pair of pliers to straighten the frame or clean the rollers. Always remember to wear gloves and safety glasses for protection.
Can I remove and reinstall the same screen after cleaning, or will I need to replace it?
Whether you can reuse a screen after cleaning depends on its condition. If the screen is damaged or overly worn, it may be best to replace it. However, if the screen is simply dirty, a thorough cleaning with a soft brush and mild soapy water should suffice and you can reinstall the same screen after it has dried.
1 thought on “How To Remove Screen From Sliding Window: With & Without Tabs”