Bay windows are not only aesthetically pleasing but provide natural light and an extended view of the outside. However, when these windows start to leak during rainstorms it can cause damage inside your home and a lot of stress.
Fortunately, with some clever methods, you can prevent future leaks or fix any existing ones without having to incur high costs or hours of labor. In this blog post, we will go over expert tips on how to detect bay window leaks and repair them quickly so you can get back to enjoying all the benefits they have to offer!
Step 1: Identify Where the Leak Is Coming From
Before you start taking any action to fix your bay window leaks when it rains, first you need to figure out where exactly is the water coming from. Start by examining the area around your bay window and look for obvious signs of water damage, such as damp spots or discolored areas on the walls or ceiling.
If the leak seems to be originating inside your home, then this likely indicates a problem with caulking or weatherstripping around your windows that needs to be addressed.
On the other hand, if moisture appears to be seeping in from outside, then this could indicate an issue with flashing or siding near your window frames that need repair.
Step 2: Diagnosing the Source of the Leaks
To properly diagnose and fix a bay window leak, you may need to use some investigative tools like a flashlight or moisture detector. Look for any signs of water damage around your windowsills, frames, and siding that could indicate where the water is coming from.
Also, check all cracks and crevices around your windows to make sure they’re sealed properly.
If you can’t find the source of the leaks on your own, it might be time to call in an expert home inspector who can help pinpoint exactly where the problem area is. This could save you time and energy in the long run by helping you target only those areas that need repair or replacement.
Step 3: Clogged Gutters and Downspouts
One of the most common causes of bay window leaks is clogged gutters or downspouts. The water that collects in your eaves, as well as rainwater, can become trapped and start to back up into your home if these systems are not cleaned regularly.
Make sure you clean out your gutters and downspouts every few weeks to ensure they’re free from debris such as leaves and dirt. You should also check for any damage caused by animals that might have infiltrated the system and blocked it with nesting material.
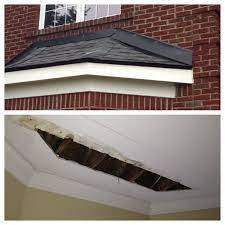
Step 4: Inspect Window Flashing Around Bay Windows
The window flashing around bay windows is a crucial part of protecting them against water damage. It consists of sheet metal or rubber membranes that are nailed to the window trim and form a barrier between the wood frame and the surrounding masonry or siding.
If you notice any gaps, cracks, or warping in your flashing, it may be time to replace it with new material. This can be a bit tricky since the flashing must be securely attached to prevent water from seeping into your home through any openings.
Step 5: Check Window Seals for Cracks or Damage
Window seals are designed to keep water from entering windows and doors. If they’re cracked, worn out, or broken in any way, then moisture can easily get inside where it doesn’t belong and cause serious issues.
Step 6: Check Your Caulking
Caulk is used to sealing any gaps between the window and the wall or between the frame of your bay window and the masonry surrounding it.
Over time, this can become cracked or compromised due to weathering and age. If you notice that it’s cracking, peeling, or missing in certain spots, then you’ll want to replace it with new caulk as soon as possible.
Step 7: Inspect Gutters and Downspouts
Gutters help direct rainwater away from your home while downspouts provide an additional layer of protection by ensuring that no water pools near windows or siding.
Make sure they are clear of debris so they can do their job properly, and ensure that any water that is pooled near your windows is directed away from the home.
Step 8: Check for Damage to the Window
If you’ve noticed water around your bay window after it rains, then there’s a good chance that there could be damage to the window itself. Inspect the window frame to make sure there aren’t any cracks or gaps that could let in moisture.
If you find any, these need to be repaired as soon as possible before they become more serious issues.
Step 9: Replace Any Damaged Caulking
Before applying the new caulk, make sure to remove all of the old caulk with a putty knife before sanding down the edges of the window frame. This will help to provide a smooth surface for the new caulk to adhere to. After this is complete, use an outdoor-grade adhesive caulk designed specifically for windows and doors.
Step 10: Ensure Proper Ventilation
The next step in ensuring that your bay window isn’t prone to leaks when it rains is to make sure that there’s proper ventilation. Make sure any vents around the window are open and unblocked so that air can easily flow through them.
If you find any blockages, remove them immediately so that air can easily move through the space between the inside and outside of your home.
Step 11: Inspect Window Seals
If your bay window has been around for a while, it’s likely that the seals may need to be replaced. Take a look at the window seals and check for any signs of wear or damage.
If you find any gaps in the seal, this could be letting in water which then causes leaking when it rains. Replace any faulty seals with ones specifically designed for your bay window.
Step 12: Install Gutters
Installing gutters on your roof is another surefire way of preventing leaks from happening in your bay window when it rains heavily. Make sure to install them securely and regularly clean out debris so that they can work effectively.
This will ensure that water is diverted away from your home and windows before it has a chance to get inside and cause damage.
Step 13: Check for Clogged Drains and Vents
A common cause of bay window leaks, when it rains, is clogged drains or vents. If these become blocked, water can seep into your home through the windows. To prevent this from happening, regularly check both your drains and vents to make sure that there are no blockages.
If you find any, clear them out immediately so that water can be diverted away from your house rather than entering through a leaky window.
Step 14: Replace Damaged Windows
If after all of these steps the leak persists then it is likely that there is some kind of structural damage to one or more of your bay windows. The only way to resolve this issue permanently is to replace the windows entirely.
This may involve the help of a professional window installer, so make sure you discuss your options with them before committing to any repairs.
Related Topics:
Conclusion
A leaking bay window can be an immense source of stress and frustration for homeowners. Fortunately, there are some simple steps that you can take to identify and fix the problem before it becomes worse.
From inspecting the seals to replacing damaged windows, there is no shortage of solutions if you know where to look. With these tips in mind, you should have everything that you need to quickly and easily get your window back into good shape.
Don’t forget to consult with a professional window installer if the repair job is beyond your current skill level. With the proper care and maintenance, you can enjoy your bay windows for years to come without having to worry about pesky leaks during rainy days.
Good luck with your repair project!
FAQs
Q: What should I do if my bay window leaks during rain?
If your bay window is leaking, the first step is to identify where the leak is coming from. Once you’ve done that, you can take steps to repair any damage and prevent further water infiltration. Some common solutions include checking caulking and weather stripping, inspecting drainpipes, and inspecting the roof for any signs of deterioration or damage.
Q: How often should I inspect my bay windows for leaks?
It’s important to inspect your bay windows regularly so you can catch any issues before they become serious problems. We recommend doing a thorough inspection at least twice a year (spring and fall are good times). This will help you spot any signs of wear and tear, as well as any water infiltration.
Q: How do I check for leaks in my bay windows?
To begin, check the caulking and weather stripping around your window frame. Make sure it’s not cracked or broken, and if so, replace it with fresh caulk/weather stripping. Also, inspect any drainpipes connected to your bay window – these may be clogged or faulty. Finally, inspect the roof above your bay window for signs of deterioration or damage.
Q: What should I do once I have identified a leak?
Once you have identified a leak in your bay window, there are several steps you can take to repair the issue and prevent more water infiltration. First, seal any cracks in the frame using an appropriate sealant. If the leaks are due to weather stripping, try to adjust it and reapply caulk or weather stripping as needed.
If your leak is caused by a clogged drainpipe, you can use a garden hose to flush out the debris and clear the pipe. Finally, inspect and repair any roofing above your window if necessary.
1 thought on “How to Fix Bay Window Leaks When It Rains | Expert Tips”